

The 1940s headscarf/bandana has been one of the best discoveries I have ever made in life. At least, when it comes to vintage fashion.
Bandana styles are quick, practical, stupendous for windy/wet days, offer another way to accessorize, and are quite recognizably "vintage". They cover pin curls, horrible hair days, thinning or graying hair, and I cherish the styles for my woke-up-10-minutes-before-leaving days.
Not to mention, for the working women of the 1940s, they were often required for safety to keep this from happening:
 |
| Veronica Lake promo pic for a factory safety campaign |
As the base for the hair tutorials I am sharing with you guys below, I'm using a typical, easy 1940s bandana-tying base using a square bandana. There are a lot of tutorials on how to do this, so I'm not going to reinvent the wheel; I'll just give you this link to instructions. Many of the styles work best with hair that has been pin curled, too, although curling on the spot works as well.
(Pardon the lighting weirdness in the pictures, por favor! The sun set faster than I intended....)
Supplies for all the tutorials:
brush - bobby pins - hair spray - square bandana (or a large triangle one, tutorial here!)
The Twist-and-Pin
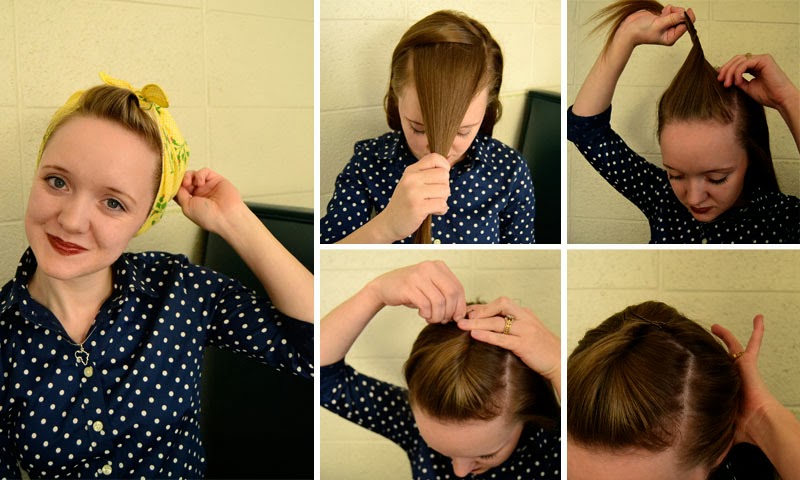 This tutorial is the easiest. Simply take a section from the front, twist it, push it up toward the hairline a bit to make it pouf, and pin it down with bobby pins in an "X". Put the rest of your hair into the scarf (by twisting it or even pin curling it for later) and tie. Secure with bobby pins on the side for extra hold.
See the 'do fully styled here.
The Single Victory Roll
 This is the same as the twist-and-pin style, except instead of twisting the front portion first, you will put on your scarf, then take the front portion of hair and roll it into a single victory roll that is pinned perpendicular to the hairline. Hairspray!
The Suicide Roll
 Still keeping the same basic instructions as the last two styles, you will now put your scarf on, comb the front portion of hair forward, and roll it backwards in a pin curl toward the hairline. (The pin curl will be horizontal.) Pin at the base and hairspray.
See this 'do fully styled here.
The Front Poof
 This can be done in a couple ways:
- You can separate a large portion of hair from the front, ear to ear. I like to put my scarf on at this point to make sure I position the rolls correctly. Now divide the front hair into three sections, make a vertical victory roll out of each section, rolling it away from the mirror. (I used a hair rat in the middle because my hair isn't very thick.) Each roll will line up with the others, creating the look of one large roll. Hairspray.
You could also use a curling iron for a roll like this.
- Or, you can divide the hair into a front and back section, put a long hair rat behind the front section, lay your hair over it and pin down behind the hair rat, covering the sides of the rat with the hair. Then you can tie your scarf on over the ends of your hair.
The Faux Bang
 Divide a large section from the top and front of your hair, then put the rest of your hair into a scarf and tie it on. Roll your hair down and toward your hairline and pin at the base. A hair rat could also be used to make the roll a little easier and neater. Hairspray.
The Poodle Poof
 Short hair: For shorter hair, pull out a section from the top and front of your hair as in the tutorial above. Put the rest of your hair in a scarf and tie it up. Tightly curl the hair in small chunks, then brush it out to give it some poufiness. Hairspray!
Long hair: Separate a chunk of hair from the front as before. Twist the rest of your hair from the nape of your neck and pin it up along the line a mohawk would be on. Leave the ends free. Tie your scarf on over the twist with the ends and the front section left out. Curl all these ends tightly, then pin the curls down to create lots of rolls. Hairspray.
See this 'do fully styled here.

Other Tutorial Sources:
 {1} Va-Voom Vintage: 5 Ways to Tie a Head Scarf
{2} The Freckled Fox: Modern Pin-up Week- #4 Easy Faux Bangs
The Freckled Fox: Sweetheart Hair Week- #6 Candyman Curls
(Pardon the lighting weirdness in the pictures, por favor! The sun set faster than I intended....)
Supplies for all the tutorials:
brush - bobby pins - hair spray - square bandana (or a large triangle one, tutorial here!)
The Twist-and-Pin
See the 'do fully styled here.
The Single Victory Roll
The Suicide Roll
See this 'do fully styled here.
The Front Poof
- You can separate a large portion of hair from the front, ear to ear. I like to put my scarf on at this point to make sure I position the rolls correctly. Now divide the front hair into three sections, make a vertical victory roll out of each section, rolling it away from the mirror. (I used a hair rat in the middle because my hair isn't very thick.) Each roll will line up with the others, creating the look of one large roll. Hairspray.
You could also use a curling iron for a roll like this.
- Or, you can divide the hair into a front and back section, put a long hair rat behind the front section, lay your hair over it and pin down behind the hair rat, covering the sides of the rat with the hair. Then you can tie your scarf on over the ends of your hair.
The Faux Bang
The Poodle Poof
Long hair: Separate a chunk of hair from the front as before. Twist the rest of your hair from the nape of your neck and pin it up along the line a mohawk would be on. Leave the ends free. Tie your scarf on over the twist with the ends and the front section left out. Curl all these ends tightly, then pin the curls down to create lots of rolls. Hairspray.
See this 'do fully styled here.
The Curly Frame
This one is quite simple. Tie your scarf on, and pull out some hair from the front. If your hair is pin curled already, then leave it. If not, curl the hairs now and brush them out a bit if necessary.
Other Tutorial Sources:
{2} The Freckled Fox: Modern Pin-up Week- #4 Easy Faux Bangs
The Freckled Fox: Sweetheart Hair Week- #6 Candyman Curls
Vixen Vintage: How to tie a 1940s turban


Great tutorials! I'm a fan of the poodle and the curly frame myself, I've worn both in blog photos. I prefer them to ones such as the faux bang as I don't think that one suits me as well at all.
ReplyDeleteThese are great! I love the poodle pouf. Not sure how it will work with my longer hair but I want to give it a try. :)
ReplyDelete-Emily
My hair is pretty long and it works just fine; it just requires more bobby pins!
DeleteTerrific howtos! Your hair looks so charming and classic in all of these styles. I think the poodle poof looks especially cute on you.
ReplyDelete♥ Jessica
Wow. I didn't realize the variety of looks that could be done with a bandana. I can't decide which is my favorite! Thanks for the tutorial!
ReplyDeleteI found your this post while searching for information about blog-related research ... It's a good post .. keep posting and updating information.
ReplyDeleteSolid Scarves UK