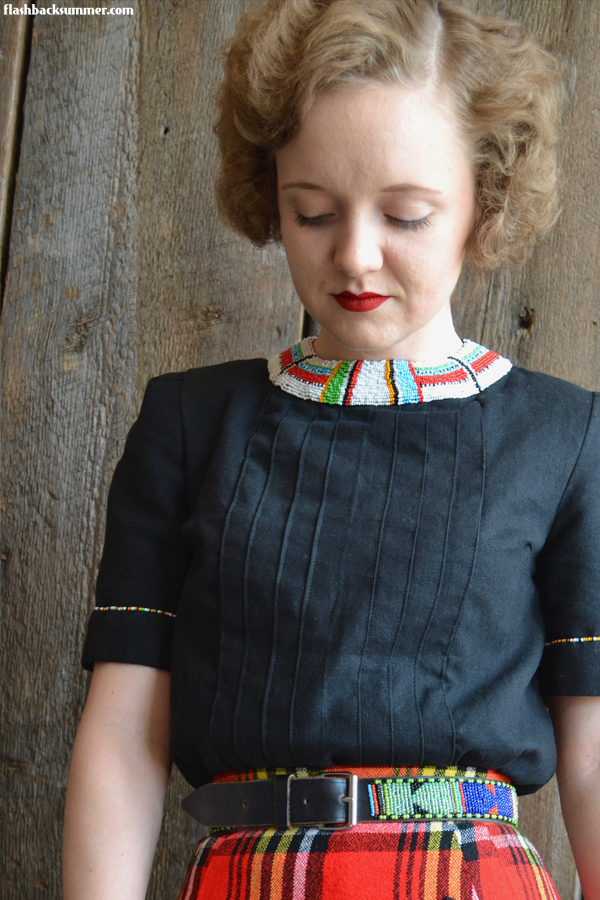
Although the blanket or shuka was the original inspiration for my Maasai ensemble, it is the blouse that took the longest to make! This is a longer post, but considering the months that went into making this top... I want it to get the credit it deserves!
The Design Concept
As I talked about in my overview post, I didn't want to make just a plain colored blouse to go with the skirt. Those are a dime a dozen, and I was afraid that the look would come off as too Scottish because plaid is more readily attributed to Europeans than Africans. I wanted something in the blouse to seal the look as African-inspired.
While shuka are commonly identified with the Maasai while in Africa, their beaded jewelry is connected to them worldwide. Their large, collar-style necklace, stacks of bracelets, and bright colors are unique to their aesthetic. I wanted to incorporate this into the top so it would scream MAASAI when I wore it.
However, I also didn't want it to look like a costume. I happen to own one of the beaded collars I bought in Kenya, but it looks out of place in my midwestern U.S. context and borders on costumey or, at the very least, "trying way too hard" because of its large size and very long beaded strings that hang down the front. I wanted to incorporate beading in a more scaled-back way. Tying in my love of Western 1940s looks would be a plus!
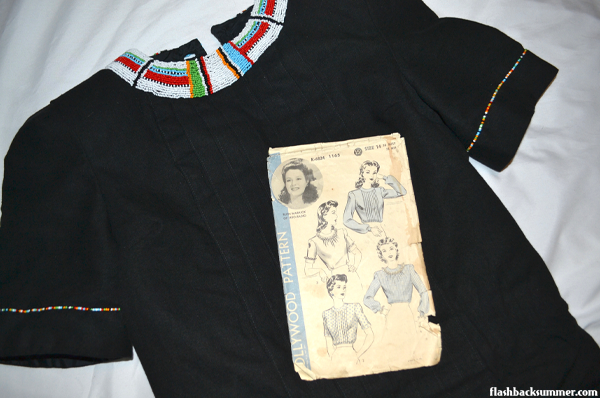
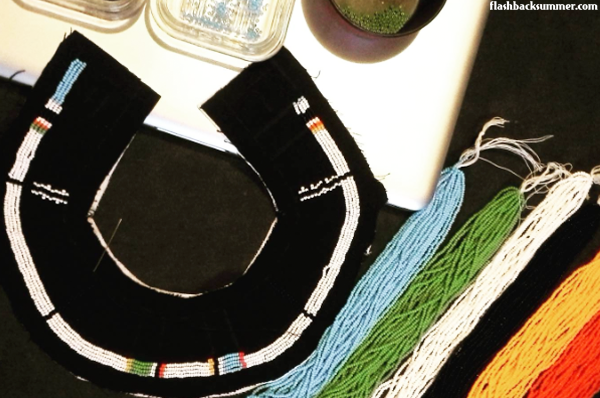
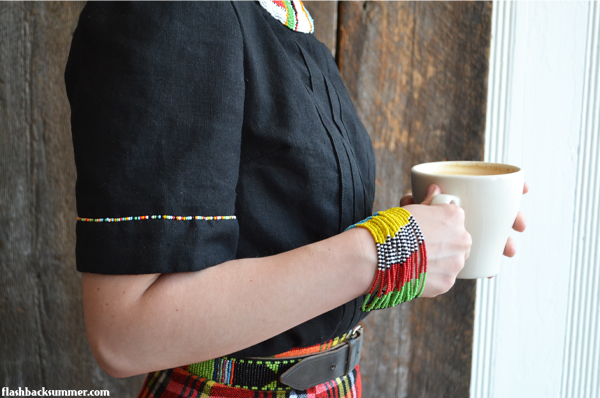
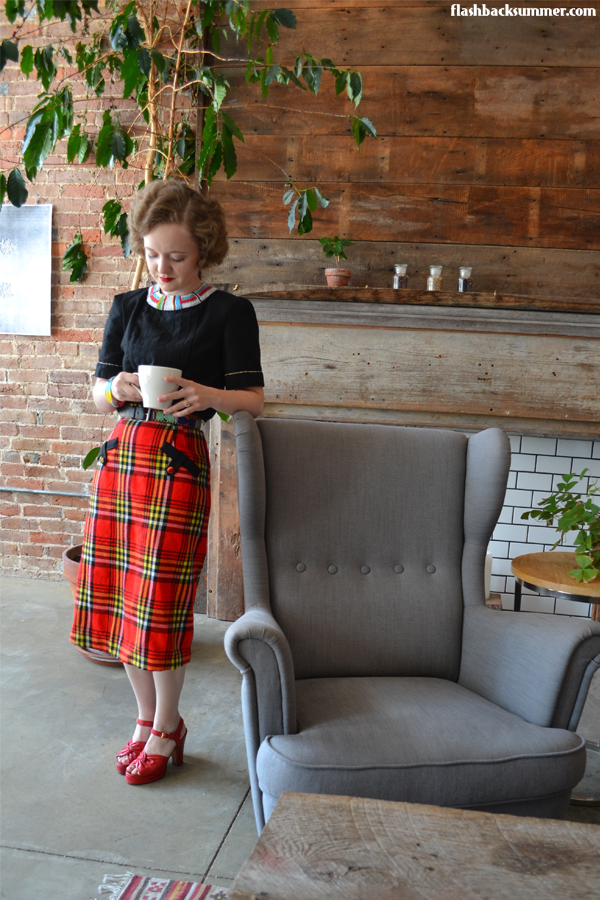
I waited and waited, but no design for the top ever felt quite right... until I stumbled across this pattern, Hollywood 1165! Someone gave it to me, and I made up version three for a work shirt. It dawned on me that the circular yoke around the neckline would be a perfect shape to mimic a Maasai collar-necklace. I happened to have some drapey black wool in my stash, so I cut out a collar piece, interfaced it, and got to work on the beading!
The Beaded Collar
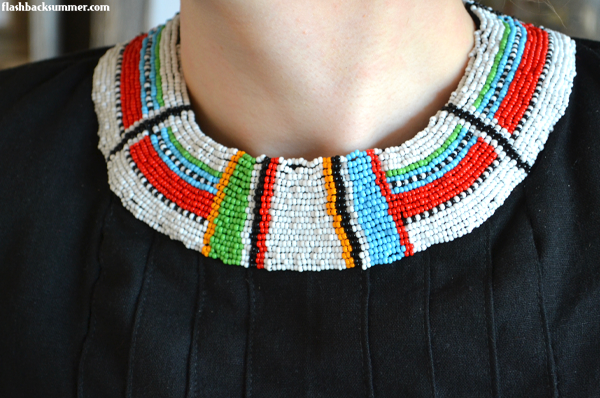
Now for any of you that actually do beading... I'm obviously not an experienced beader. This was my first attempt at such dense beading, and while it is by no means perfect, I'm pretty happy with it. I have had these tiny, tiny seed beads in my stash for several years. I bought them in the Omdurman bead market when I was living in Sudan, and they've been waiting in a bag ever since. While many Maasai pieces created for women involve more orange and bright yellow beads, I worked with the colors I already had and arranged them in a way that would make them pop most against the black blouse. Quite honestly, if I ever had the opportunity and resources to make such clothing again, I'd much rather collaborate with a Maasai woman to do this part. They're just so much better at it!
In authentic Maasai pieces, the bead colors have significance:
orange - preferred by women
white - milk or purity
red - blood, warriors, danger, or bravery
black - rain
green - pastures, vegetation after rainfall, peace
blue - the sky or God
I didn't directly copy any Maasai jewelry that I saw because I don't want to rip off anyone's work or pretend this was made by a Maasai artisan. I did try to stay true to their aesthetic, though, and I based it off of one of the simpler necklace motifs I found in my research. It is important to note, however, that there are meanings behind motifs and even the type of jewelry piece. Each item tells a story about the wearer.
Blouse Construction
Once the collar was done, I began construction on the rest of the blouse. I chose a view with pleats down the front to keep a streamlined silhouette while connecting the colorful parts of the outfit, the neck yoke and pencil skirt. I foolishly thought this view would be similar in sizing to the work shirt I created... and I was very wrong. While the back of the blouse fit well, the front was weirdly about 4-5" too baggy, and the yoke and pleat sections didn't fit together well. I had already cut it out of my fashion fabric, so I made it work but removing excess at the side front pieces and hand sewing many parts together to be sure they fit just right. It was a long, frustrating process, but I'm quite happy with the results!
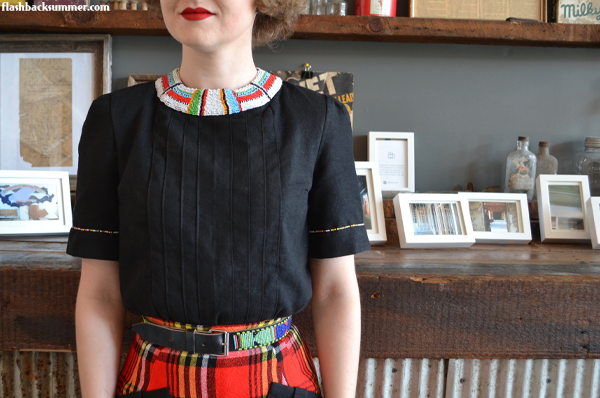
I also chose to add a cuff to the sleeves instead of turning the hems under, and I added a string of randomly arranged seed beads around them. I didn't want to lose the cuff detail in the dark fabric, and it lines up with a Maasai aesthetic principle that "more is more!"
I lined the entire blouse in a black bemberg rayon. After all that work, I wanted the inside to look as good as the outside. It covers the seam allowances and shoulder pads and will increase its longevity when worn. It also prevents the wool from touching my sensitive skin.
The Buttons and Buttonholes
Obviously, I couldn't let all the pretty stuff of the blouse be on the front and leave the back neglected. The pattern had a fantastic button-up back detail, and I jumped on this to add some visual interest.
However, I also wanted the buttons and buttonholes to match the couture quality of the rest of the blouse. Machine-sewn button holes would look cheap compared to everything else, but bound buttonholes would add too much bulk to the back sections which were already quite thick from the facing and lining layers. I decided hand-sewn buttonholes would add a couture touch while still being thin enough to keep everything functional and comfy. I used this tutorial to learn how to do them properly.
Many, many buttonholes later... I was loving how it looked! I love the huge amounts of buttons on some vintage pieces, and it's a detail modern clothing doesn't tend to have.
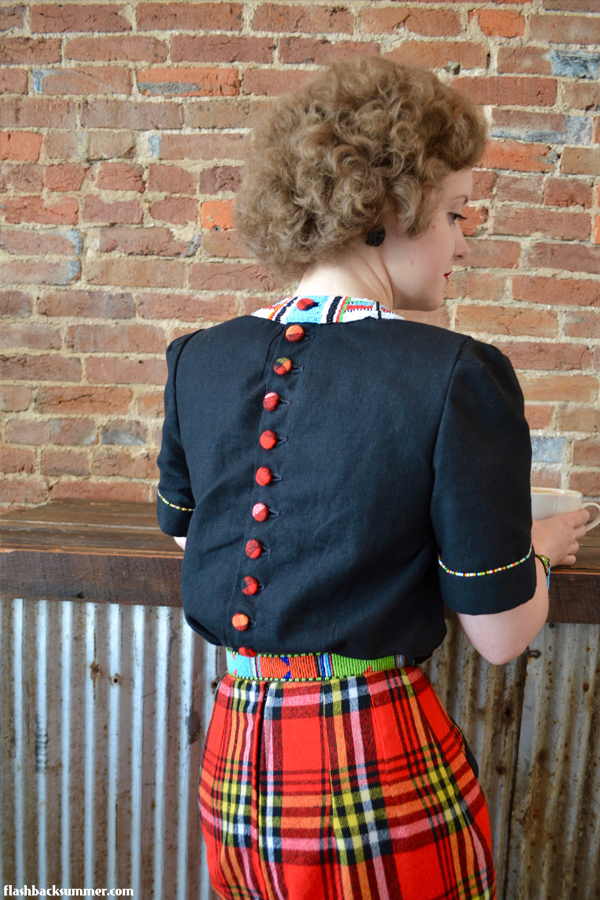
As for the buttons themselves, I wanted to tie in the shuka fabric. It kept the Maasai theme going on the back and also makes the blouse and skirt look like a matching ensemble instead of mix-and-match separates that kind of "go." I used Dritz 5/8" button kits that I could get at my local sewing store. Honestly, there must be a better option. I interfaced the shuka fabric because of its loose weave, and the thickness of the layers seemed a bit much for the little buttons. Luckily, my husband was able to brute-force them together, though their dome shapes were a bit flattened in the process. You can't really tell when looking at it, so I rolled with it!
I love how it all looks together! I'll be able to wear the blouse with other bottoms, and it will always add uniqueness to any look because of all its details. Quality-wise, I'm very proud of the couture-style work and it feels fantastic to wear.
How You Can Get This Look:
Buy It
The beauty of Maasai jewelry is that it is easily layered over the clothing you already have. Any of these gorgeous pieces in combination with your favorite black blouse will make a big fashion statement! I've also included other kinds of tops that are inspired by the Maasai, in case you'd like a bit of a different look. I just included a sampling; there are many more Maasai-inspired pieces on each site I've linked to!
Below are shops that carry authentic Maasai pieces you can buy for yourself. (I'm also very careful to vet the shops I promote to ensure there is no copycat work. These shops will directly benefit the Maasai through locally-based non-profits or connections to Maasai artists themselves. Shop with confidence!)
small check top | large check top | blue crop top
black top | patterned necklace/collar | tote bag | bracelets
Make It
If you are not dissuaded by my tales of woe and tedious work I shared already and would still like to make your own version, I'd like to empower you! While I'd still recommend buying a Maasai-made jewelry item (they do a better job), you can make your own with any seed beads you find and sewing it onto a garment. Then, for a blouse, pretty much any blouse with a rounded neck will do. It will be even easier if there is a rounded yoke piece. Here are a few things available:
1950s EvaDress Pattern | Simplicity 1796 | McCall 7196
bemberg rayon lining | button cover kit
What do you think of the top? How about Maasai jewelry? How would you style it in your own looks, if you feel right doing so?
For further reading, check out:
Symbolism of Maasai Jewelry
The Secret Life of Beads
(There is a list of more generally Maasai-related articles in this post)
Have you ever had one of those outfit ideas that stays in your head for weeks, months, or even years? You mull it over in your mind and figure out every little detail until, finally... it is time. I've probably been pondering this particular idea for about two years!
In my case, it was finally time to cut the fabric that inspired me in the first place, a Maasai shuka. As I explained in my last post, my sister gave me this blanket when she came back to the U.S. from Kenya. It didn't get much use as it was, and I wanted to make into something that could be worked into my daily life more often. Obviously, my go-to is clothing!
I turned the shuka into a pencil skirt, and I made a blouse to coordinate. I didn't want to make just a plain top; I wanted it to reflect the Maasai heritage of the skirt. I was afraid that without a bit more uniqueness, the skirt would just look like another plaid skirt.
I will get more into the sewing details and specific inspiration behind the blouse and skirt in the next two posts (as well as how you can create and/or buy your own versions!), but until then, check out my overview post about Maasai culture and aesthetics, and here is the first group of ensemble photos!
Stay tuned for the next posts, and feel free to read more about the Maasai in the extra reading here!
The idea for an ensemble started with a blanket.
A red plaid blanket.
And now it is a fantastic outfit! But... you won't get to see that until the next post, mwahahahaha! First I want to tell you guys about the background behind the outfit and the people it is inspired by: the Maasai (or Masai) tribe of East Africa.
I'll start with the more personal connection to this tribe: You guys know I lived in East Africa with my fam and that my parents still live there. For visa purposes and such, about once or twice a year we were required to leave the country we lived in to get paperwork sorted. Kenya was directly south, easy to get into as far as travel visas go, and it's a beautiful country with fantastic shopping, so obviously it was the top choice! Kenya happens to be one of the countries in which the Maasai live (along with Tanzania).
As well, after I went to university, my sister attended a boarding school in Kenya for her last two years of high school. She, I'm told, had an amazing two years with some incredible schoolmates. The culture of her school was very intercultural as it housed students from all over the world and was set in a rural area in the mountains. Part of the culture there included an abundance of Maasai blankets or "shuka": loosely woven, usually red plaid or striped blankets perfectly sized for one person. They are worn by the Maasai, often draped and knotted loosely around them. The students carried these everywhere, using them as coats in cold weather, as fruit baskets, as blankets to sit on when outside.
When my sister came back for college, she gifted me with one of these blankets. I've loved it and often used it when sitting outside, but most of the time it was tucked away. I wanted to do it better justice as a souvenir of a country I've loved visiting.
So I made it into something you'll see in my next post, and it became the base of a Maasai-inspired ensemble!
 |
| source |
The Maasai are a tribe known for producing fierce warriors. In past years, they would hunt lions to protect their livestock and display their prowess, most often with only one man hunting and killing a lion on his own with a spear. (Nowadays, with the declining lion population that has changed a bit.) The men are agile and able to jump really high, a skill that is shown off in ceremonies. They are also considered some of the tallest people in the world (though I can't for the life of me find a source directly stating this with scientific proof).
One of the things I most admire about the Maasai is their entrepreneurial spirit. In modern-day Kenya and Tanzania, their traditional culture and ways of life are being threatened and influenced by urbanization and modernization, but they are fighting to maintain their identities. One of the most brilliant ways they have begun supporting themselves in recent years is by selling their traditional handmade goods to tourists and other Kenyans.
They are especially known for their intricate beadwork. They, like me, believe that "more is more" and often layer many pieces of jewelry on top of their wrapped fabric garments. They also trade their livestock for materials such as wire and beads to create these items, which they then sell to others. They know they are good at what they do and that people admire their traditional work, so they cleverly play on that and sell it to them! (Look below for more reading on this and the threats to Maasai heritage and prosperity.)
And now... just take in all the beauty! I'll have pictures of my ensemble in the next post, and now it will make more sense to you guys since you know a bit about the Maasai that inspired it.
Further reading:
- Maasai Association: Preserving and Celebrating Maasai Cultural Heritage
- Video - Maasai: a Brief Understanding
- A Lesson from Louis Vuitton's Spring-Summer 2012 Maasai-Inspired Collection
- CNN: Will You Be Rocking the Maasai Look Next Fall?
- Maasai Women Launch Successful Dairy Business
- Can a Tribe Sue for Copyright?
- The Problem with White People Who Dress "African"
- Misappropriation of Maasai Culture - A Reflection of Eco-Tourism in Kenya
I think most of us can deeply appreciate the beauty of a well-fitted button down shirt, as well as its El Dorado-level scarcity that makes it such a prize to have. Being short, narrow-shouldered, and in love with 1940s styles, I have had a lot of difficulty finding such a blouse to add to my wardrobe, so I've endeavored to make it myself.
I discovered a really great contender with this 1940s pattern I sewed up a while ago. Since then, I sewed other views from the pattern to make some work shirts for myself. While it was fantastic, it also came untucked a lot when I would reach for things at work, and that annoyed me greatly.
Thus... I implemented this flex-sleeve armscye hack from the Boyer Sisters' blog, and it did wonders! I am getting closer to the perfect blouse pattern, step by step...
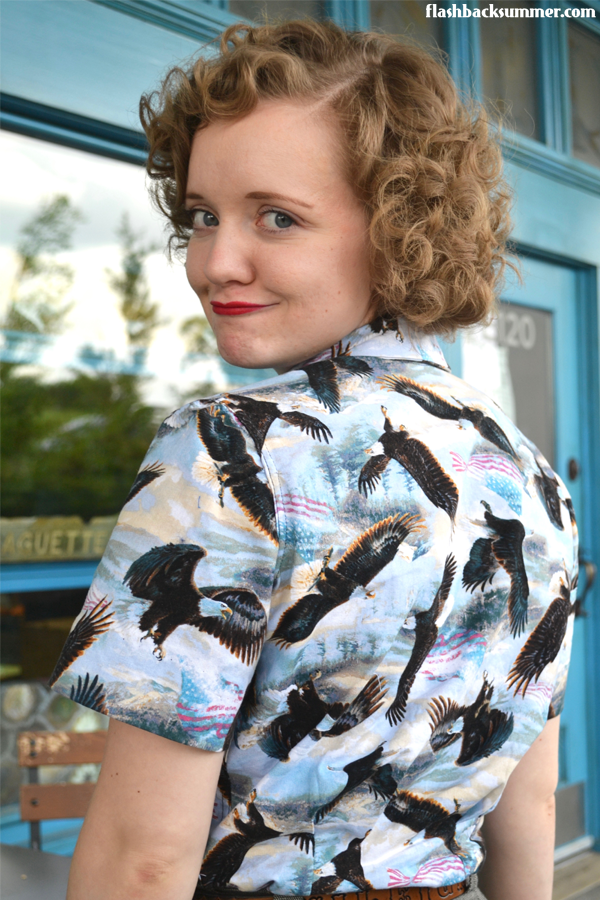
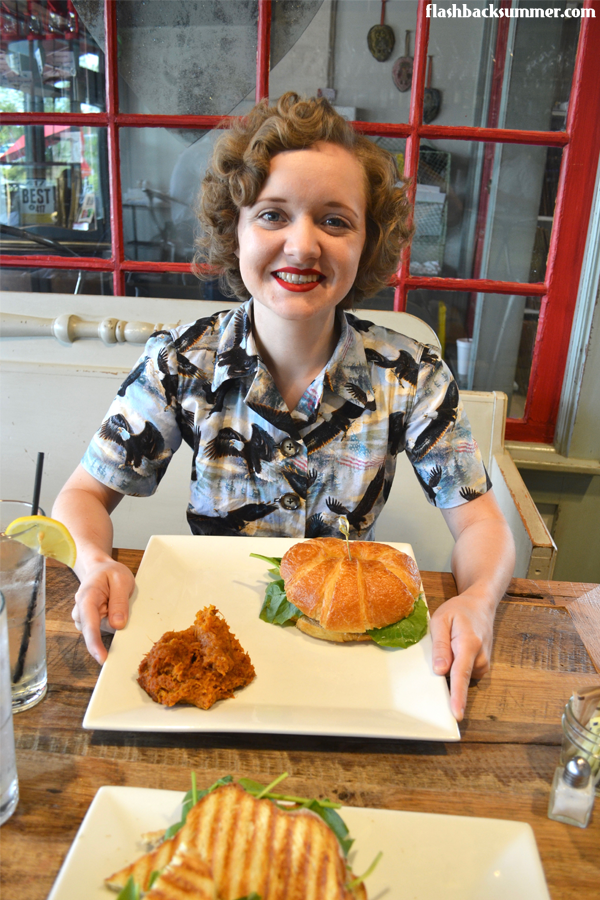
I decided to round off the bottom of the armhole adjustment made in the hack tutorial, and I felt quite good that this was it. I would have a perfect blouse. I recalled this hideously-awesomely 'Merica eagle fabric I had bought and new it would be perfect for a wearable muslin test of my pattern adjustments. If it failed, I wouldn't be too upset. If it worked... I would have a crazily American eagle shirt to wear, which is an obvious win.
It turned out perfectly wearable, as you can see! While I feel it's the patriotic version of a wolf shirt, it's always acceptable to be cheesily patriotic in the Midwest.
The only issue? I may have forgotten about directional prints, and now the eagles on my back are forever swooping downward. But I don't see that part when I wear it, so I can deal with it.
At this point I'm getting nitpicky, but I have just one very small tweak for the next version... and, seriously, it will be a perfect blouse. I just want to trim the front of the armscye to curve in a bit more, and it'll be good. I've traced the adjusted pattern pieces to make new, fresh pieces to use on my next round of blouse-sewing.
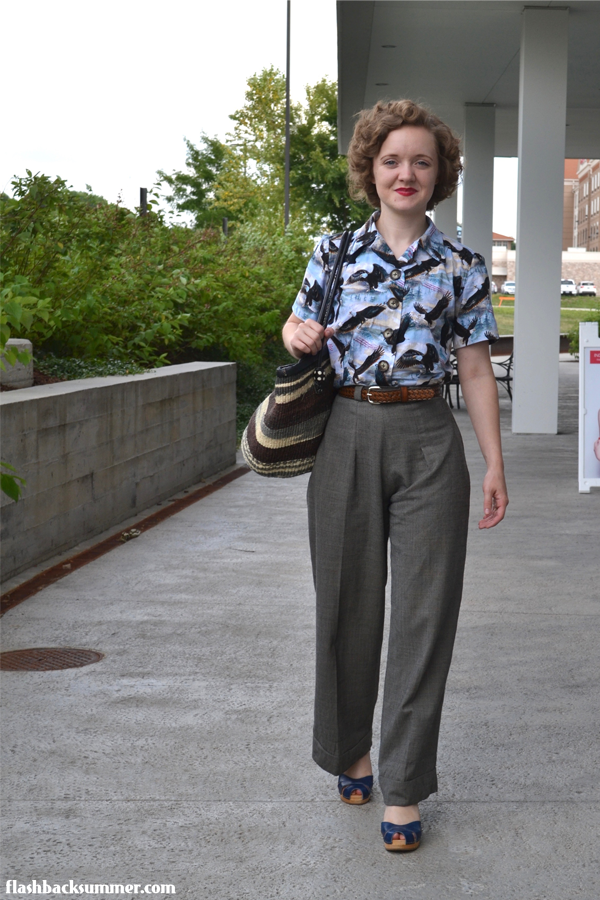
Until then, this blouse does quite nicely! I wore it to a lunch date with my husband at the Aviary Creperie, one of my favorite restaurants in town. The bloused fit and cotton content makes it a perfect shirt for the upcoming patriotic summer season of July!
Outfit Details
blouse: me-made, Simplicity 4762
trousers: me-made, WH "Smooth Sailing" Trousers
belt: bought at local festival
shoes: Swedish Hasbeens
purse: gifted, from Kenya
Have any of you tried a flex-sleeve adjustment or found another tweak that aids in increasing mobility in vintage blouse patterns? What do you think of this hideously-awesomely 'Merica eagle print?
It's now full-fledge summer time here in Missouri, and it has coincided perfectly, for once, with my sewing plans. When Brigid of the Boyer Sisters put out her "Linden Lady" palazzo pants pattern, I bought it immediately, thinking they would make fantastic summer pants. At the time, it was a single sized pattern. Earlier this year she multi-sized it, and I received a complimentary updated version to review. I, of course, was very glad to do so, and now I have some fantastic summer trousers that coordinate perfectly with my giant summer hat! (I have a summary of all of this below if you want the TLDR version.)
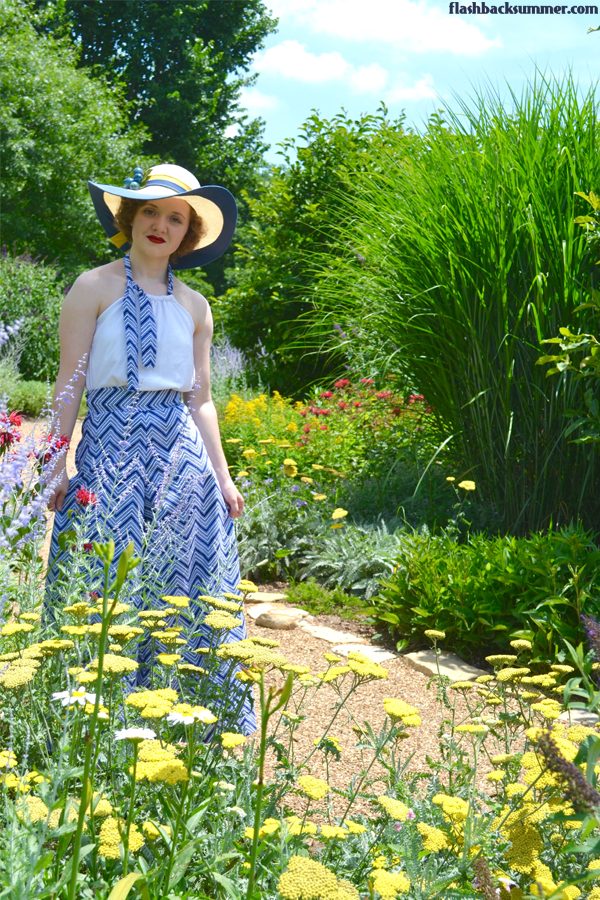

When I saw the pattern, I couldn't help but think of 1930s palazzo pant styles with giant sun hats and loose tank tops perfect for the beach. Living in a land-locked state in the middle of the U.S., I obviously decided that that is exactly what I need... beach pajamas! While they don't get used at actual beaches.... we have a lot of lakes and rivers around here that they still work quite well for.
The pants pattern comes with three waistband versions in different button and zipper combos to suit your preference. I picked the view with just a zipper going all the way up the extra-high waistband. I didn't make any changes to the pattern except to shorten it 3-4" for my petite self, an adjustment I usually have to do with trousers.

These were great to put together because there are only three pattern pieces, and I got them done in about a day. No darts, lots of straight seams... It's fantastic! This pattern would be especially awesome if you're a beginner sewist or newer to apparel sewing. The instructions are really thorough and have very clear illustrations for each step. It would be a lot more helpful to beginners than any patterns from the Big 5 or even most indie designers, and I highly recommend it.

I made mine up in a chevron print quilting cotton. Sure, they wrinkle a bit when worn, but nothing beats breezy cotton on a hot day. It breathes, it's comfy, and it will drape even more beautifully as it is washed and softens up. And I managed to get the print mirrored at every seam!!! I'm actually pretty proud of that, I won't lie.

The trousers are fantastic, but they really needed a top to coordinate. I wanted it to be a really quick, easy top to merit the times I'll wear it outside. I wanted it to be simple and not a lot of work so if I sweat or play outside in it... I won't feel like I need to coddle it or be careful. Basically... I needed the 1930s version of a cutoff t-shirt.
I got a t-shirt that my husband has had that is too big for him, and I cut it up into a rectangle for the back and a shape for the front that looked like a triangle on top of a rectangle. I folded the top point down and sewed it to make a tube, then I threaded a ribbon made of the trouser fabric through it, and... bam! Matching top! Done and done.

I highly recommend this Linden Lady Palazzo Pants pattern to you guys. It's quite affordable, and it's great to support a budding female entrepreneur from our own vintage community. I am definitely going to be making this pattern up again!
Here is a summary of the pattern details and things I changed:
Fabric: Buttercream quilting cotton
Pattern: Brijee "Linden Lady Palazzo Pants"
Year: 1930s style
Notions: waist zipper, interfacing for waistband
How historically accurate is it? Cotton and metal zipper are accurate, the fusible interfacing no one can see is not... but no one can see it, so I'm going to say it's pretty 1930s.
Any tricky parts to the pattern? Just be sure to mark front and back pattern pieces. The leg pieces are huge, so it's a good thing to keep it all organized. Also, the waistband is wider at the top than the bottom, so be sure not to flip it!
Did you change anything? I shortened it by 3-4".
Time to complete: one day
First worn: 18 June 2016
Total cost: The pattern originally cost me $8 for the single size, and the multi-size was given to me by Brigid for review. The fabric was about $20 for 4 yards. The zipper is from my stash.
Notes: I've gone into great detail above! I love this pattern and highly recommend it!
How would you style palazzo pants? What fabrics would you pair with this pattern for your own wardrobe?
It seems to me that Springfield, Missouri is one of those communities that you love the more you get into it. My sister is queen of local events and networking, so I've been trying to up my game and learn more about my hometown.
One of my favorite things to do on Saturday mornings is to go to Commercial Street (C-Street) and check out the small farmer's market there. (It's one of three farmers' markets in the city.) The area is surrounded by quaint coffee shops, delicious bakeries, and small boutiques, so it's a great place to buy the veggies for the week then sip an ice cold beverage with a friend.
They oftentimes mix other events with the farmer's market, like the Car Show for the Kilties I attended recently or, in today's case, a dog adoption event! There were lots of cute dogs around, and that made it a lot better, in my opinion.
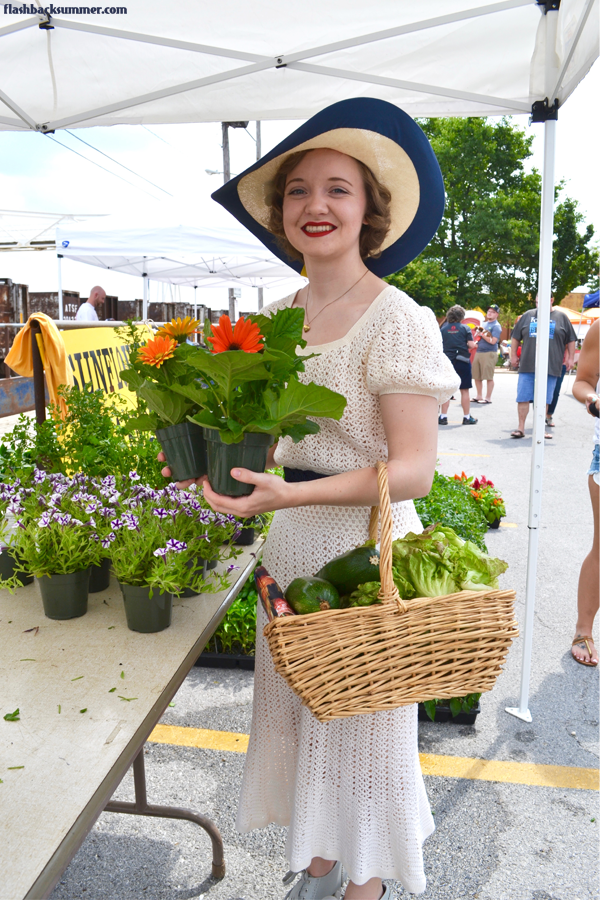
I've been saving this 1930s crocheted dress for the summer when it would really fit the season. I got it a few months ago in a FB group for vintage clothing that needs TLC. It was stained a bit under the arms and here and there, but a dip in retro clean and a wash has made it look like new!
It's made of cotton yarn and breathes beautifully with all the holes in the pattern and light color. Topped with my giant sun hat Tanith Rowan custom-made for me, I had the best summer outfit ever! I perused the vegetables and local crafts while feeling cool and put together. Giant sun hats and lipstick do that.
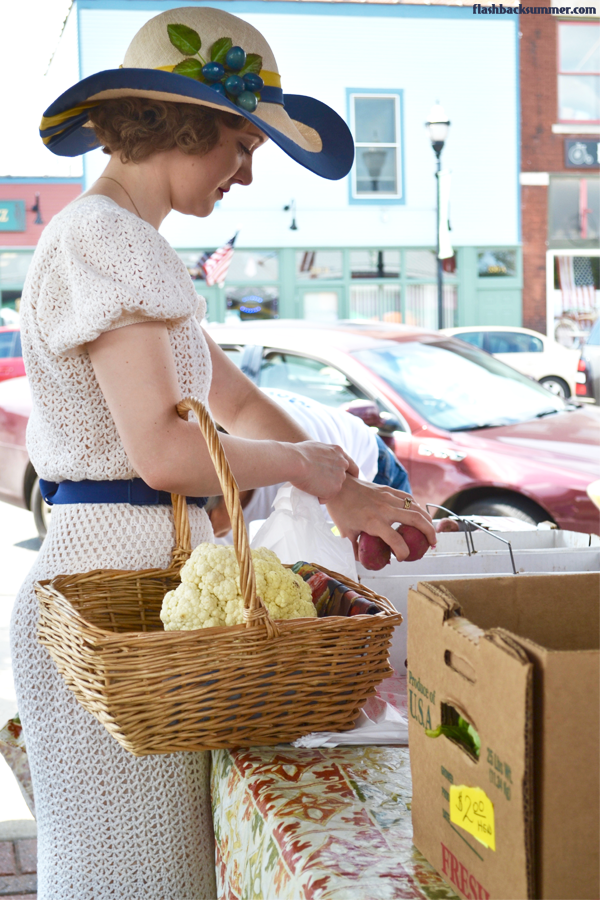
I also loved getting to know some of the vendors at the market. I met Denise of Afromationpottery, a lady that makes pottery goods and also spins her own yarn. I also got to meet the Sunflower Gardens crew that owns a family farm in the area. I bought a cilantro/coriander plant and some gorgeous flowers from them that are now cheering up my front porch.
Springfield, it's often said, is a mid-sized city with a small-town feel, and I'm learning to love it more and more!

Outfit Details
dress: 1930s vintage
shoes: ModCloth
hat: Tanith Rowan Designs, custom-made (read about it in this post)
Have you rocked a giant sunhat yet this summer? Do you have local farmer's markets you attend?
