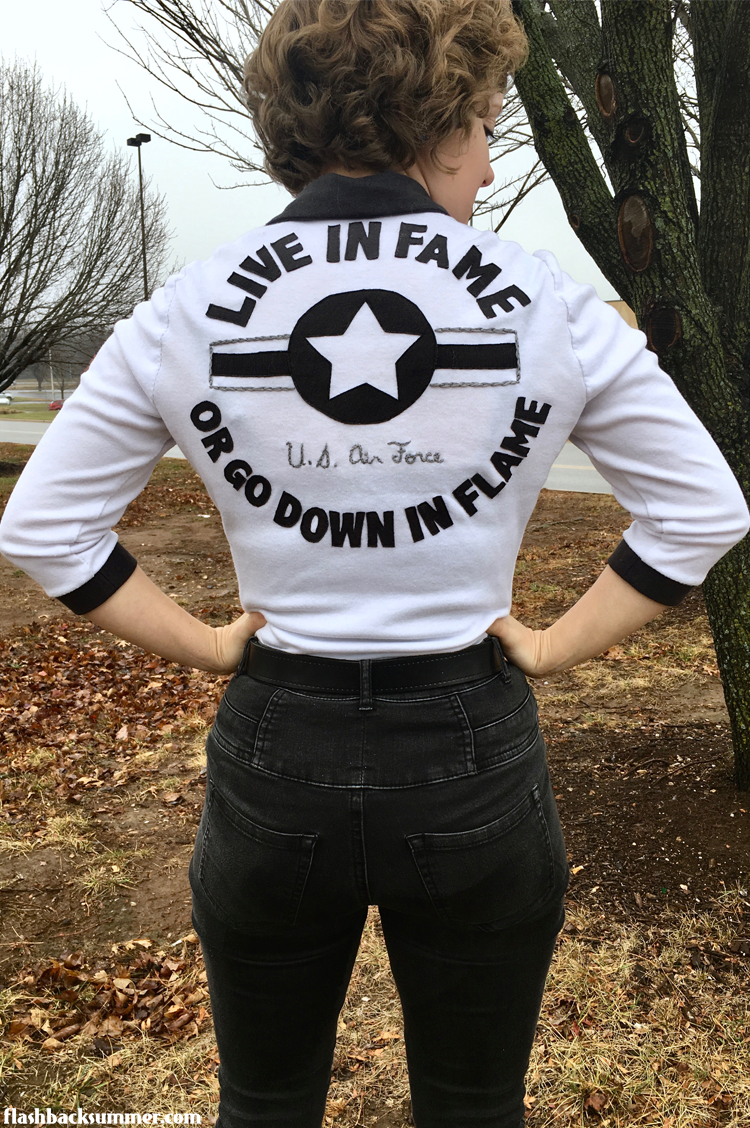
I'm pausing the #vintagedecemberstyle to share this Air Force themed shirt I made and wore on my birthday. As I said in a previous post, my measurements are changing. It's been a good catalyst to delve into sewing knits! This is my second project with a knit (the first will be posted later), and I'm pretty pleased with it. This outfit is also a good example of a casual, vintage-inspired look that I wear often. I love vintage, but I also really love skinny jeans!
I used a 1940s two piece dress pattern (which I'll talk more about in the first project post) and tweaked the top to work with knits. I referenced this great blog post from American Duchess on how to do that. I used the paper pattern and removed the bust and back darts, changed the side seam curves, and decided which seams to sew with a zig zag stitch and which to sew with a straight stitch. I also interfaced the front collar pieces to keep them crisp.

The shirt itself is alright, but what I'm really proud of is the lettering on the back!
I helped a friend make her boyfriend a vintage Harley-inspired top by sewing letters onto a pullover. It sparked an idea in my head for an Air Force shirt.
While I like some of the military shirts out there, the women's shirts tend to be geared toward spouses and, well.... kind of fluffy. Swirly fonts and sparkles. Those are good and I'm not knocking them, but some days I want something that has a bit more edge to it and has more of the tough vibe I see in the men's shirts. Vintage styling would be a plus.

So I modeled this shirt after some of the old women's Harley shirts I've seen in photos. While I didn't take progress photos because I was in the throes of inspiration and experimentation, here were my steps. (I did the back decoration on the back shirt piece before sewing it together. Being flat, it was a lot easier to manage. You just have to watch your seam allowances.)
1.) I decided my phrase and a general idea of a layout on the back of the shirt.
2.) I printed out letters, a star, and a circle I could trace that were the right size.
3.) I cut those paper bits out.
4.) I ironed Wonder Under onto a large piece of dark gray fabric for the letters.
5.) Before removing the paper of the Wonder Under, I traced the letters onto the fabric and cut them out, being sure the Wonder Under was on the back side of the letter.
6.) I removed the paper backing of the Wonder Under and painstakingly laid out all the pieces on the back of the shirt where I wanted them. I measured, checked, and triple-checked everything. Then I pressed them with a steamy iron as the Wonder Under directions instructed.
7.) I painstakingly sewed around each letter and shape on my sewing machine. (There's a lot of painstaking bits to this.)
8.) I finished off the design with embroidering "U.S. Air Force" and the rectangle edges in gray embroidery floss, being careful not to stretch the knit. I put a layer of knit interfacing behind these parts.
9.) I sewed together the rest of the shirt.

I like this shirt a LOT, and I'll definitely be using this idea again in the future. My only major tip and thing I'll change on my next version is to buy a high-quality knit with good rebound (What's the word? Elasticity? Springiness?). Over the day this shirt begins to lose its shape because I used a low-quality knit to experiment with. The gray parts are made of a really nice knit, the scraps of my first knit project. That first knit keeps its shape beautifully, so I've learned my lesson! Nice knits only from now on.
Outfit details
shirt: me-made
jeans: Kohl's
shoes: Red Wing Iron Rangers
I also paired these photos with a post on how my vintage fashion and military ambitions are being reconciled in my head. Read about it on the military blog Jacob and I author here.


Wow, you did a wonderful job with the shirt! I love the lettering. And I like the way you mixed contemporary style with vintage style. It can sometimes be difficult to combine the two styles without a bit of a clash, but you made them blend seamlessly here! :)
ReplyDelete(I thought I had replied earlier, but apparently not!) Thank you so much! I’m glad it’s working.
DeleteI'm almost sure the word you're looking for with the stretch is 'return'. Ie: how well does it 'return' to it's pre-stretched form. That sounds about right? Maybe? Now I've typed it, it doesn't look right...
ReplyDeleteThis shirt is awesome. I really like the personalised touches and the shape of the pattern itself. :D
Haha, I'm still not sure. But thank you!
Delete