80s to 20s Upcycling Project

One of my goals made during Fashion Revolution week was to give more ugly 80s and 90s thrift store items new life.  Since many of them are hideous, it requires creative upcycling in order for them to avoid the landfill.  "Upcycling" doesn't mean just "reused;" it means making an item more valuable than it was before.  I think this definitely applies to this project!

It all started with a search for shoulder pads.  When bought new, they are about $8 in my local sewing store, and that is ridiculous to me!  Why on earth would I pay $8 for new shoulder pads when there are millions of hideous 80s, shoulder-padded dresses in thrift stores for pennies?!  I went to the cheapest charity shop in town and found this "Golden Girls"-worthy beauty:


Flashback Summer: 1980s to 1920s Upcycling Project - recycled 80s dress becomes 1920s summer dress

Not only does it have shoulder pads (which I promptly ripped out for use in 1940s projects coming up), but it also came with a bunch of buttons on it that I can save for later.  Never throw out notions!

I originally planned to make a dropped-waist 1940s style dress that utilized the pleated part of the skirt (huzzah for modern chemically-set pleats that don't need to be re-ironed!).  However, when I got the dress home I realized that while it is sort of a two piece dress.... the lining is attached at the neckline to the outer fabric, and the pleated fabric doesn't go up very far on the bottom layer.  So.... it wouldn't be long enough for a 40s skirt.  New plan!


Flashback Summer: 1980s to 1920s Upcycling Project - recycled 80s dress becomes 1920s summer dress

Flashback Summer: 1980s to 1920s Upcycling Project - recycled 80s dress becomes 1920s summer dress

I decided to go for a "cusper" type of dress that can be styled to look either 20s or 30s depending on how it's accessorized.   I brought in the sides to make a more fitted silhouette along the hips and a tiny bit at the waist.  I added a deadstock 1960s collar that is wide enough to balance out my hips as far as proportions go.  I also put on some buttons at the neckline to help simulate a v-neck line that is more flattering for my round face without having to rework the neckline of the dress.  Lastly, I removed the sleeves and used the sleeve heads as ties for a bow under the collar.  It took me about a day and a half to complete and I used items from my stash.

Flashback Summer: 1980s to 1920s Upcycling Project - recycled 80s dress becomes 1920s summer dress


Flashback Summer: 1980s to 1920s Upcycling Project - recycled 80s dress becomes 1920s summer dress

Flashback Summer: 1980s to 1920s Upcycling Project - recycled 80s dress becomes 1920s summer dress

Flashback Summer: 1980s to 1920s Upcycling Project - recycled 80s dress becomes 1920s summer dress

The dress has a step-in zipper at the back, but the collar opens at the front.  Therefore, wanting to avoid reworking the collar and zipper altogether, I tacked the collar down to the dress on one half, then the other half detaches to allow the neckline to open at the zipper in the back.  The collar is snapped back on with a couple snaps behind the bow on the bodice.  It worked out pretty well!


Flashback Summer: 1980s to 1920s Upcycling Project - recycled 80s dress becomes 1920s summer dress

Flashback Summer: 1980s to 1920s Upcycling Project - recycled 80s dress becomes 1920s summer dress

Obviously, it isn't a perfect reproduction of a 1920s dress.  The 20s didn't use mile-long nylon step-in zippers, polyester shiny materials, or serged seams.  However, for $4... I think I've captured the vibe pretty well, so I'm happy!

Today I styled it for the 20s, but I'll show you a more 30s aesthetic in a future post.  To get the 20s look, I rolled with the baggier silhouette and threw on a cloche and some dolly lips.  It's a super easy outfit and I'm proud to say it's the first 20s-style dress I've made that I actually like! I always have problems trying to balance out my hips and create a longer-looking silhouette, but I think this one works!


Flashback Summer: 1980s to 1920s Upcycling Project - recycled 80s dress becomes 1920s summer dress

Flashback Summer: 1980s to 1920s Upcycling Project - recycled 80s dress becomes 1920s summer dress

I wore it to a local museum's textile exhibit and drooled at all the historical clothes.  You have to get very close to see stitches... but I'm not actually touching them, so it's okay, haha!


Outfit details
cloche: made by me
dress: made by me, upcycled
shoes: Modcloth
ring: thrifted
lipstick: Kat Von D "Outlaw" lip stain

1964 Spinnerin Yarn - Because Your Work Deserves the Best

Flashback Summer: 1964 Spinnerin Deadstock Vintage Yarn

Flashback Summer: 1964 Spinnerin Deadstock Vintage Yarn

My grandma is a great ally when it comes to finding vintage awesomeness at estate sales.  She lives in a different state than me, so she goes to all kinds of sales I would never be able to attend.  On a recent visit, she brought me some fabulous prizes: vintage yarn!

Oh wait, it's also in it's original packaging.

And in the original box.

With the original company invoice.

And the invoice is dated with the year 1964.

Flashback Summer: 1964 Spinnerin Deadstock Vintage Yarn

Yes, it is very awesome!  Two boxes were found in a closet, both from the Spinnerin yarn company and full of amazing yarns imported from Switzerland.  

I did some research on the Spinnerin company, and it was started in the early 1950s.  The company produced yarn and patterns until 1982 when it closed down.  They were located in Hackensack, New Jersey.  Aaaannndddd.... That's pretty much all I could find that wasn't a pattern, believe it or not.

The yellow yarn is a 100% viscose yarn that seems thinner, perhaps a fingering weight yarn.  Viscose is made of cellulose from plant fibers and is closely related to rayon.  There are only a few skeins of this one, but it's very soft, and Spinnerin guaranteed the yarns would match if dye lot numbers were the same!

Flashback Summer: 1964 Spinnerin Deadstock Vintage Yarn

The other yarn is from a "Ski sprint" yarn, one I'm guessing that was especially intended for winter wear.  It's a thick, worsted weight yarn (according to this chart) in a cream color.  It's 19% mohair, 75% virgin wool, and 6% rhovyl-vinyon.  The boxes seem to coordinate with this yarn type and says it is protected by Scotchgard to make it stain and water-resistant.

Flashback Summer: 1964 Spinnerin Deadstock Vintage Yarn

In case you're like me, I needed to look up a couple of these fibers to be sure I knew what they meant:
(These are my paraphrased definitions.)

mohair - made of angora goat fur, sometimes mixed with wool
virgin wool - yarn made of wool spun for the first time, as opposed to skanky recycled wool (heh heh).
rhovyl-vinyon - this yarn explanation gets real science-y real quick.  (For a more complete description, you can read about it here on pg. 71.)  Basically, it's a synthetic fiber that provides weather-resistant and insulating properties to the yarn.

Flashback Summer: 1964 Spinnerin Deadstock Vintage Yarn

Now you all must be wondering... What will you make with all this yarn, Emileigh?

To answer you... I don't know yet.  There isn't very much of the yellow, and you have to be careful with discontinued yarns.  If you get into the middle of a project and realize you don't have enough, you're pretty much screwed.  I'm going to look at a bunch of patterns and try to do some math before deciding on a project.  If you have suggestions that you think would work for this amount and type of yarn, I'd love to hear them!

Flashback Summer: 1964 Spinnerin Deadstock Vintage Yarn

Other resources:
Spinnerin knit & crochet patterns
Spinnerin yarn chart

1942 - "Modern Clothing Depends on Chemical Science"

Flashback Summer - 1942: Modern Clothing Depends on Chemical Science - vintage rayon, viscose, cellulose, fashion science

This article is from the third book in a multi-volume series entitled "Building America."  First published in 1936, my sister found this updated version from 1942 being given away in her university library.  The subject matter is fantastic, the covers beautiful, and the colors match mine and Jacob's home decor, so she snatched them and gave them to me!

The book series covers many aspects of American life such as farming, heavy industry, war and peace, education, culture, healthcare, and even clothing.  It's a really interesting look at America and it's history from a 1942 perspective.

I found this article on the chemical science behind the "new" fabrics of the day especially fascinating.  Buttons made of milk, mercerization, and the connection between viscose and rayon... just a few of the interesting tidbits explored in the article!  It was a bit tricky to try to scan a hardback book, so I've typed out the complete article for your reading pleasure below:

Modern Clothing Depends on Chemical Science

Chemical products are important in the process of making the clothes we wear.  Before wool and silk, cotton and linen, can be used by the spinner and the weaver they must go through many chemical processes.  And within the past thirty years, the chemist has perfected a new set of textile fibres--the rayons.

The chemist develops ways to free fibres such as wool and silk from foreign matter and impurities of many kinds before they go to the spinner.  These fibres are washed with specially made soap-like compounds until they are clean and pure.

Flashback Summer - 1942: Modern Clothing Depends on Chemical Science - vintage rayon, viscose, cellulose, fashion science
Left photo: Winding rayon threads on spools, after which these threads are woven into cloth or clothing.  Rayon, a chemical product, is made in somewhat the same way as Cellophane.
Right photo: Testing a sample of dye to be used on a print fabric. This modern chemist has produced hundreds of shades which our forefathers never saw in garments.

Fibres and fabrics are bleached chemically for use as "white goods" or to prepare them for the dyeing process.  Many years ago bleaching was done by soaking fibre or cloth in vinegar or buttermilk, or by spreading out linen and cotton in the sun.  But as the production of these fires increased with the use of power looms, a more practical way was needed.  It was then that chemical bleaches were first used.  At first, bleaching powders were made by combining chlorine with lime and water.  Although for many years the textile industry used this method for whitening materials, it was not quite satisfactory since this bleaching process sometimes weakened the fibers and made them unfit for use. Today other chemical compounds are used which make the chlorine harmless after it has done its bleaching work.

In the dyeing of cloth the chemist performs another valuable service.  At first, as explained earlier, the only coloring materials used were those gotten from natural products.  Now the chemist makes many thousands of colors from coal-tar. The manufacture of these synthetic dyes is an interesting and complicated chemical procedure.

Flashback Summer - 1942: Modern Clothing Depends on Chemical Science - vintage rayon, viscose, cellulose, fashion science
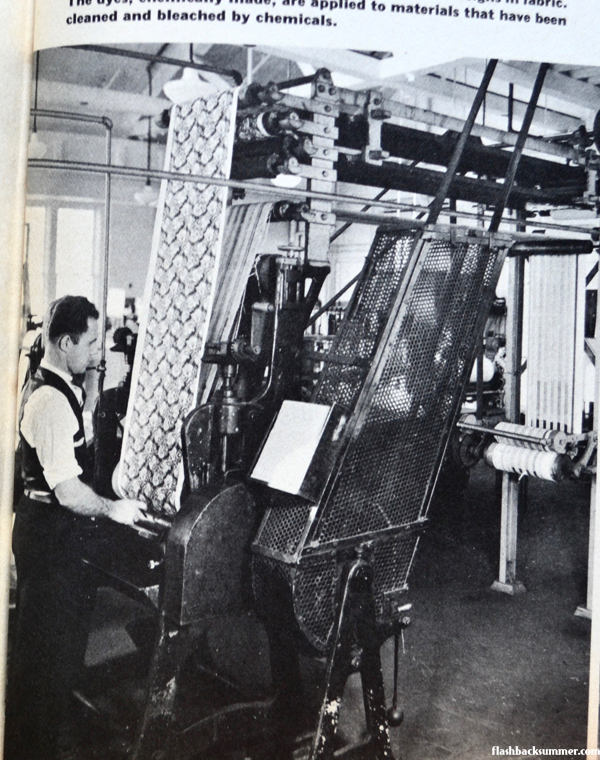
Trying out dyes on a machine that prints designs in fabric. The dyes, chemically made, are applied to materials that have been cleaned and bleached by chemicals.

We often see the word "mercerized" used in connection with cotton fabrics.  Mercerization is a chemical process which makes cotton resemble more expensive material.  This is done by putting woven fabric in a solution of caustic soda.  When the soda is rinsed out the fabric has a silkier and more attractive-looking finish.

One of the marvels of modern chemistry as applied to the manufacture of clothing is that of rayon.  Rayon is a textile fibre chemically produced from cellulose which is the main element in the cells of all plants and trees.  Spruce, the wood used to make Cellophane, is also used in making rayon. 

As early as 1664, scientists were seeking a man-made fibre.  In 1884, a Frenchman named Count Hilaire de Chardonnet studied the silkworm and the chemical composition of the mulberry leaf on which the silkworm feeds.  He found that the silkworm's food was made up mainly of cellulose, and it was possible to "digest" it chemically and then to force the cellulose solution through a tiny hole and solidify it.  He called his method the nitro-cellulose process.  This man-made fibre was introduced in the United States in 1910 and was sold as "artificial silk," "glos," "synthetic silk," and under many other names.  In 1924, manufacturers agreed on the name "rayon" for all man-made fibre based on cellulose.  They have been known by the name ever since, although the chemical process used by de Chardonnet is no longer used in the United States.

Today, rayon is made from spruce wood and cotton fibre by dissolving the cellulose in them with chemicals.  This forms a thick liquid known as viscose.  After a series of chemical baths the viscose is forced through tiny holes from which it drips in filaments as fine as silk fibre.  These filaments are then twisted together to make thread or yarn.

Flashback Summer - 1942: Modern Clothing Depends on Chemical Science - vintage rayon, viscose, cellulose, fashion science
In the clothing of this man and woman are chemical products such as rayon in the gown and tie, and a coating for the heels of shoes that prevents "scuffing."

Rayon has become a very important textile material, and in 1937 one billion yards of rayon material went into dresses, underwear, piece goods and linings. 

A large variety of chemical products are used to make leather for our shoes, belts, gloves, purses, wallets, and luggage.  Chemistry has also produced many substitutes for leather and tanning.

The very buttons on our clothing are now being made of substitute materials by means of chemical processes.  The waste skim-milk of the dairy supplies the chemist with casein from which he makes a plastic material that can be molded into buttons.

Perhaps we most often think of chemistry as applied to clothing when we use a cleaning fluid.  The most common chemicals used are benzine, gasoline, and naphtha.  These are inflammable, and recently chemists have found safe substitutes for them.

Did you learn anything new from this article?  Will it affect how you view or care for your vintage clothing?

Video Tutorial: My Go-To Pin Curl Set


As promised, here is a video tutorial showing my go-to pin curl set that I use to achieve my daily 'do.  As I explained in my last post about my hair, the final look this set gives me can be altered by a couple variables:

- the length of my hair (newly trimmed vs. slightly longer)

- the length of time since my hair was permed
- how well the pin curls decide to brush out that day
- humidity

When I made this video, my hair was a bit shorter than it is now, so it looks a tiny bit different.  However, the set is still the same!


Let me know if you have any questions, and I'd be glad to help!


Perm & Haircut Talk

Flashback Summer: Vintage Perm & Hair Cut Talk

I've gotten a few questions from you guys about how I do my hair each day.  Well, it was about time for me to get a perm, so I figured I would photograph the process to show you guys the "base" of my daily hairdo.  

I LOVE having short hair.  I know it's not as common in the vintage community, but this "baby" cut was the military standard for women in the U.S. in WWII, and it's super easy to deal with.  I just pin curl my hair at night, and it takes 5-10 minutes to brush out and hairspray in the morning.  I highly recommend it!  This is what it takes to get this 'do:


First off, the haircut!  My hair is pretty short, about 4-5" long all the way around, and naturally VERY straight.  I forgot to take a picture before my perm of what it looks like in its natural straight state, but the picture below is pretty close.  I think the only differences are that my top layers are a bit shorter and my part is on the side.  


Flashback Summer: Vintage Perm & Hair Cut Talk
source

The stylist called my layers "round layers," should you need that information in getting your own cut.


In a previous trip to a stylist, I took the 1940s baby middy chart that I had seen floating around the interwebs.  An older stylist with a lot of experience said the chart was not very helpful and was missing some important info.  He said, though, that most haircuts had a similar technique in shaping and layering up until the 1980s, so... basically I've found the phrase 'old lady haircut' quite helpful in describing what I want, ha!  It never hurts to bring in more sources to help your stylist, though, especially if they may not be used to vintage looks. I will oftentimes bring the chart and a bunch of reference photos to help.


These are some of the photos I brought in to help my stylist understand what I wanted in a cut and style:


Flashback Summer: Vintage Perm & Hair Cut Talk

Flashback Summer: Vintage Perm & Hair Cut Talk

Flashback Summer: Vintage Perm & Hair Cut Talk

Next is the perm!  Here is all the relevant information I have about the type of perm I get:


- I use the gray rollers; these are the second smallest size, I believe.  I have a lot of baby hairs, so the stylists used whatever perm paper technique on each roll that kept all the little hairs in.


Flashback Summer: Vintage Perm & Hair Cut Talk

- The set is a basic one with all the rolls going downward.  Nearly all of the rolls are the normal length with a couple half-size ones used where necessary.  

(For this particular set, there was a bit of "contouring" at the side back sections just to accommodate the necessary tightness needed on the roller to get a good curl.)

After the perm, this is what my hair looked like:


Flashback Summer: Vintage Perm & Hair Cut Talk

It was really curly and already started to show the shape that I wanted: volume around eye level and at the top, tapering down to the neck, with a side part.

After getting a perm, you aren't supposed to wash your hair for a day or two to help it really set in.  I just wet it a bit and set it in flat pin curls.  (I'll have a video about my pin curl set in a couple days!)

After the pin curl set has dried and I have brushed it all out, this is my finished style:

Flashback Summer: Vintage Perm & Hair Cut Talk

The perm makes a huge difference to the longevity and volume of my style.  Before this perm, my hair wouldn't cooperate at all.  Curls wouldn't set well, my hair wouldn't wave properly, and that's why I have been wrapping my hair so often lately!  The perm does wonders! 

I also asked the stylists about which kind of perm would work well for those of you vintage ladies with highly textured hair.  They said that it depends strongly on the texture and coarseness of your hair, but you can do one of three things to achieve this same kind of look:
- A perm, like what I got
- A relaxer then curly-perm combo
- A curl reformation

A professional stylist should be able to help you determine what would be best for your hair texture in creating a vintage 'do.


Flashback Summer: Vintage Perm & Hair Cut Talk

Okay, one last bit of insight about my haircut: the length of time since a perm and trim makes a big difference in the "bounce," volume and longevity of my hairdo.  Since my hair is short, even small trims can have a big effect on how the hair falls around my face.  It just takes a bit of getting used to after long hair, but I roll with it and it's okay!  You may see subtle differences in my upcoming pin curl set tutorial and post photos in how my hair lays even though it's the same set, and this is the reason why.

Have you ever gotten a perm?  Does your hair routine require any special work to get your locks into a vintage look?


Other vintage hair posts:
Lavender & Twill: Middy Plus cut
Bobby Pin Blog (vintage hairstyle blog)
Vintage Current: My Middy Cut
Styling Coarse and Curly Hair

Wearing History Homefront Overalls

Flashback Summer: Wearing History Homefront Overalls - 1930s 1940s WWII Rosie the Riveter

I. LOVE. THESE. OVERALLS.

You are looking at my uniform for this summer: t-shirt, overalls, flats.  It'll be happening all the time.

WHY have I not made up this Wearing History Homefront Overalls pattern before now?!  I have no idea.  I've ready many fantastic reviews from other sewists, but I haven't gotten around to making them until now.  I went with the overalls version first because... well, overalls, obviously.  I haven't had a pair since I was a kid, and I think that's wrong.

When I told my sister I was making overalls, she sneered.  

"Are they acid wash, or, like... 90s overalls?"

Flashback Summer: Wearing History Homefront Overalls - 1930s 1940s WWII Rosie the Riveter

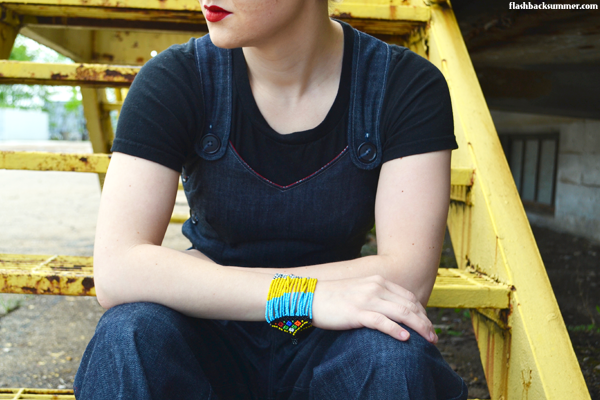
No, they are classy, awesome, very vintage overalls!  They are fitted at the top and feature a sweetheart neckline.  The waist has a thick, comfy waistband, and the legs are roomy and have a longer rise for ease of movement.  They're fantastically 30s/40s and perfect for the non-stretch denim I had in my stash.

Flashback Summer: Wearing History Homefront Overalls - 1930s 1940s WWII Rosie the Riveter

As far as the sizing, I went with the suggested pattern sizes that coordinate with my body measurements: 32-24-35 and petite.  This coordinated with the e-pattern for size pack A.  I used size 14 on the top and bottom and graded them both to a size 12 (24") at the waist.  This worked really well on the bottom half, and the legs and hip area are comfortably baggy.  However, there is a bit of gaping at the back of the top between the straps.  The dart placement is great, though, so I think next time I will just size down to the 12 (30" bust) and make it all a bit tighter.  This should get rid of the gaping at the back and create a snugger fit on the sides.  I may even go for styling a 1930s "farmerette" look on the next version!

Flashback Summer: Wearing History Homefront Overalls - 1930s 1940s WWII Rosie the Riveter

I also took the time to topstitch a lot of the seams and serge most of the seam allowances.  It just adds a RTW, quality feel to it that I like and also reinforces the seams a bit to make them durable. ('Cuz I plan on wearing it a LOT, like I said.)  

I added back pockets as well.  They don't come with the pattern, but they're really easy to draft yourself.  The patch pockets on the front are awesome, but when it comes to bending and moving around, it's better to have back pockets to put stuff in.  I did just realize, though, in looking at pictures of other versions people have made, that I probably shouldn't have put a buttonhole through the front pocket, just under it... Oh well.  Live and learn.  Button plackets are kind of my nemesis.

Flashback Summer: Wearing History Homefront Overalls - 1930s 1940s WWII Rosie the Riveter

Flashback Summer: Wearing History Homefront Overalls - 1930s 1940s WWII Rosie the Riveter

The only other major change I made was to line the bodice instead of facing it at the edges.  I went for a fun pop of color and used this silver star and red cotton from my stash.  I thought if I did go for a farmerette look and wore the overalls as a jumpsuit that cotton would be a bit more comfortable on my skin than just denim.  It changed the construction process a bit, mostly when it came to the button placket.  I just had to be careful to think through the steps and make sure to sew each piece at the right time... sewing origami! I sewed it to the waistband seam allowance with a messy but effective blanket stitch.

Flashback Summer: Wearing History Homefront Overalls - 1930s 1940s WWII Rosie the Riveter

I am VERY happy with how these turned out.  Even with the top being a bit big, they are amazingly comfortable.  The torso is the right length for me, and the pant length gives me enough room to cuff the legs a couple times and still reach the ground. For the summer, though, I prefer to wear them Huck Finn style and roll them up to a cropped length!

Flashback Summer: Wearing History Homefront Overalls - 1930s 1940s WWII Rosie the Riveter

There is also a surprise hat pattern that comes with the overalls!  However, when I attempted it I think I rushed through and didn't do things right.  Basically... it was an epic fail and I'm not going to show it to you.  I'll try again and let you know how it goes.

Here is a summary of the pattern details and things I changed:
Fabric: Denim, 100% cotton bodice lining
Year: early 1940s
Notions: 7 buttons
How historically accurate is it? Very accurate!  Wearing History patterns are very close to originals, and denim and buttons are appropriate things to use for 1940s patterns, although they are not officially vintage.
Any tricky parts to the pattern?  The button placket.  I just struggle with these in general.
Did you change anything?  I added back pockets and lined the bodice instead of using facings
Time to complete: 3 days
First worn: April 20, 2016
Total cost: Ummm.... I think about $15 for the denim, $9 for topstitching and normal thread, and $6 for buttons, and I won the pattern in a WH photo contest!  So about $30.
Notes: My measurements are 32-24-35 and I'm petite.  Next time I will use the 30" bust size on the top and the 35" hip size on the bottoms, both graded to 24" at the waist.  The length of the overalls were fine for my torso and legs and gave me enough fabric to cuff the legs twice.  Taller people will probably want to adjust this.

Flashback Summer: Wearing History Homefront Overalls - 1930s 1940s WWII Rosie the Riveter

Outfit details:
headwrap: The Wrap Life, "Yendi" wrap
overalls: handmade by me
lipstick: Kat Von D "Outlaw"
shoes: OLL
t-shirt: gifted
bracelet: from Kenya

Other sewn-up versions of this pattern:
Playsuit version by Anneliese (post in German)
Rosie Wednesday - shorts, overalls
Va-Voom Vintage (overalls)
Pinhouse Playmate (overalls)