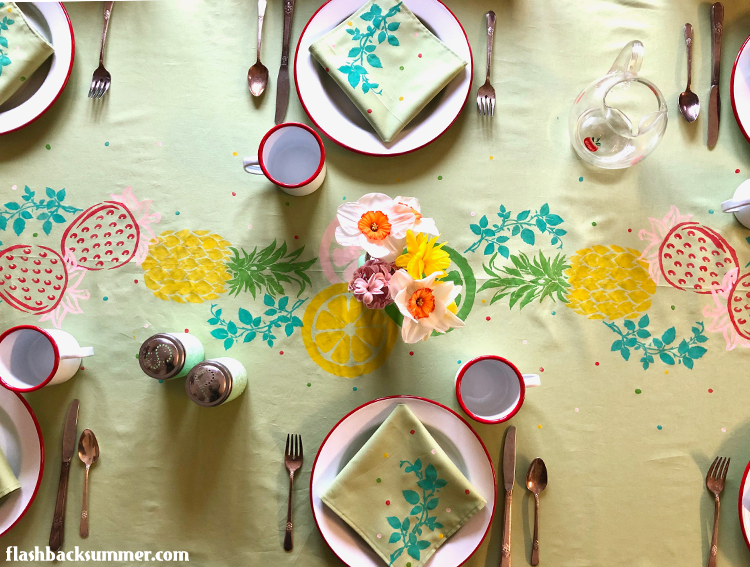
I recently got a new dining room table, which I LOVE. However, it is much larger than our previous table, and I didn't have any tablecloths long enough. When Stencil Revolution emailed to ask about collaborating, the dots connected and I knew the perfect way to fix this tablecloth dilemma!
I love the vintage stencily/painterly style tablecloths, and I thought it would be fun to give something similar a try for myself. What I love most about creating your own linens is the ability to pick exactly the colors you want. I knew I wanted something jadeite green and red to go with my kitchen and dishes, but I also wanted to throw in some other colors to make it summery and bright!
Midcentury color combos I've seen on tablecloths were creative and oftentimes featured unique combos. I picked bolder colors then threw in a cool pink for contrast.
Here are the supplies I used:

fruit stencils
I got four stencils compliments of Stencil Revolution: the 5x11” pineapple, 6x6” lemon, 5x6” vine, and the 6x6” strawberry. I figured I could use the lemon stencil and paint it in several colors to also be a lime and a grapefruit!
fabric for the tablecloth and napkins
For my 6-person table and 8 napkins, I used about 2.5 yards of fabric. Basically, I measured enough to overhang the table a bit and cut out 8 square napkins. The sizes on this don't particularly matter; they just need to fit your table and be functional.
I also used 100% Kona cotton fabric in a pale green color.
paint in desired colors
I used fabric paint. I have yet to wash all the linens, but fabric paint is supposed to be more permanent on fabrics (duh) so I went with those. I used LaurDIY Perfect Plaid fabric paints in Checkmate, Rubber Ducky, Pinky Swear, and Aqua Marine. (I mixed 50/50 Rubber Ducky and Aqua Marine to make the green color.)
other supplies: paint brush, paint palette/plate, towel, plastic trash bag (for protecting workspace), Q-tips
Instructions:
1. First, I cut out the tablecloth and napkins.
And by "cut out" I mostly mean "tore with the grain" to keep the edges straight. The 44" width of the fabric was perfect for my table, so I only had to cut the length. I used the remaining fabric and cut 8 squares for the napkins.
2. Next, I hemmed everything.
I narrowly folded the edges over twice and sewed them down with a straight stitch. You could also use bias tape for a contrast color, or a napkin stitch on a serger would also look good (and be faster!).

3. I prepped my space.
I cut down the sides of a plastic trash bag so I had one long rectangle, and I laid this on the center of my table to protect it from paint. I then laid my tablecloth fabric on top and positioned it like I would normally.

4. I laid out my center stencil and began painting.
I pretty much eyeballed the layout of the design on my tablecloth. Even vintage tablecloths are rarely printed perfectly straight or symmetrical, so this way is easier and still vintage-accurate. Luckily my table has a seam down the middle, so I used this as a guide for where to place my first citrus cluster in the center of the tablecloth. You can also measure and mark with a pencil.

I made an asymmetrical little cluster of citrus in the middle, firmly holding down the stencil with one hand while painting with the other.
These stencils are made of a thin plastic, so they hold up quite well while still being light and easy to handle!

5. I continued painting the other fruits with the other stencils.
Like I said, I eyeballed this thing. With projects like this, I like not making them perfect and just working off of what "feels" right. I began in the center, then I added fruits bit by bit until I was a few inches from either end of the table. The paint dried/soaked in quite quickly to the fabric, so I was able to move back and forth painting fruit on each side without stopping.
Tip: I rinsed and dried my stencils after each use. This prevents the little blobs of paint that end up on the back of the stencil from ruining the lines of your next fruit stencil. It keeps everything crisp!
This is what it looked like when I was done:

6. For the napkins, I then laid them all out on a trash bag and stenciled a leaf into each corner.
7. Lastly, I used the Q-tips and added little "confetti" dots to everything!
I dunno. I just thought they looked fun!

After everything dried, I had fun styling the table with my enamelware, jadeite and vintage pitcher. I like how, since the table cloth print is busy, I don't feel like I need to add much as far as centerpieces and such. It helps our larger table still look full.


So what stencils would you use for your table linens? What would coordinate with your home or are your favorites in the Stencil Revolution shop?
And my next thought is....what should I stencil next?!

These stencils were provided c/o of Stencil Revolution and I was compensated for this post, but all of the thoughts shared here are honest and my own. To learn more about my review standards, visit my policy page.


This was a very timely post for me! I was actually looking for stencils to use on some plain cotton canvas bags and feeling daunted by the million choices on Etsy. There are a couple on Stencil Revolution that should work perfectly. Thanks!
ReplyDelete